在这篇文章中,我们讨论了如何在 CentOS 上克隆一个 git repo。 我们还了解了 Git 和 GitHub 之间的区别、版本控制的含义、存储库是什么以及如何克隆存储库。
什么是 Git?
Git 是一个稳定、成熟、健壮的版本控制系统或 VCS。 Git 允许开发人员存储、更新和共享包含在个人存储库中的软件。 随着更改的发生,git 允许新软件更新用新数据覆盖旧代码,同时存储旧数据以备将来需要时使用。 它还允许多个开发人员在同一个项目上工作,对代码的不同部分应用各种更改,从而提高生产力。 这就是为什么 Git 被称为“分布式版本控制系统”的一个例子。
什么是 Git 存储库?
Git 项目称为“存储库或存储库”。 这些存储库包含与项目相关的文件和文件夹的完整集合。 它还包含 repo 中每个文件的修订历史记录。
此外,存储库对每个更改进行编目或捕获,这称为提交。 这些提交也称为快照,并作为“链表关系”持续存在。 这些提交(或快照)也可以开发成软件的新演变,称为分支。 因为 Git 是一个分布式版本控制系统,所以任何维护该存储库副本的人都可以克隆和共享一个独立的存储库。 它还可以访问整个代码库及其历史! 大多数开发人员使用命令行访问 git 存储库,它还允许执行多种功能,例如:
- 与历史的互动
- 克隆
- 创建分支
- 提交更改
- 合并新代码
- 比较跨代码段的版本更改等等。
Git 和 GitHub 有什么区别?
Git 是版本控制工具,而 GitHub 是存储和跟踪软件更改的存储库。
为什么 Git 有用?
随着软件随着新代码的添加而更新,git 会跟踪发生的这些更改并将调整添加到新的更新版本的代码中。 随着每次新的提交,软件更新的版本号也表明已经进行了修订。 开发人员使用特定的 git 命令来添加、修改和调整这些代码升级到新版本。 这允许更好的跟踪,并提供在出现问题时恢复更改的能力。
我们如何安装 Git?
安装 git 最简单的方法是使用默认的 Linux 分发包管理系统。
对于 Debian/Ubuntu,我们使用:
[email protected] [~]# apt update [email protected] [~]# apt install git对于 Redhat/CentOS,我们使用
[email protected] [~]# yum -y update [email protected] [~]# yum install git对于 Windows 服务器,我们使用来自 git网站. 在 Windows 服务器上,还有其他可用的 GUI 工具。 您可以从上面的链接下载该软件。 运行可执行文件来安装它。
最后,MacOS 也有一个可用的 git 版本。 要在 Mac 上安装 git,请在终端窗口中输入 git 命令(如“git -version”),系统会提示您安装它。 当您收到此提示时,请接受安装提示,然后按照终端中的说明进行操作。
在 CentOS 上设置 Git
现在我们已经安装了 git,我们需要对其进行配置,以便它链接到存储库。 我们首先运行命令:
[email protected] [~]# git config 接下来,我们添加我们的姓名和电子邮件地址,因为 git 将此信息应用于我们所做的每个提交。 我们可以通过输入以下信息来添加此信息:
[email protected] [~]# git config --global user.name "User Name" [email protected] [~]# git config --global user.email "[email protected]"我们可以通过输入以下内容来查看配置信息:
[email protected] [~]# git config --list [email protected] [~]# git config --list user.name=dsinger [email protected]而已! Git 现在已安装并可以使用了。
设置项目文件夹
接下来,让我们选择一个本地文件夹,将其用作本地存储库。 对于此示例,我们将使用 /root/project/ 文件夹。 现在让我们将目录 (cd) 更改为该文件夹。
[email protected] [~]# cd project [email protected] [~/project]#接下来,我们运行“git init”命令来为我们的新 git repo 选择和使用该目录:
[email protected] [~/project]# git init Initialized empty Git repository in /root/project/.git/ [email protected] [~/project]#我们现在可以看到刚刚创建的 .git 文件夹内部:
[email protected] [~/project]# ll total 12K drwxr-xr-x 3 root root 4.0K Oct 28 20:41 ./ drwxr-xr-x. 44 root root 4.0K Oct 28 20:39 ../ drwxr-xr-x 6 root root 4.0K Oct 28 20:41 .git/ [email protected] [~/project]#在 .git 文件夹中,我们看到已设置以下文件结构:
[email protected] [~/project]# cd .git/ [email protected] [~/project/.git]# ll total 36K drwxr-xr-x 6 root root 4.0K Oct 28 20:41 ./ drwxr-xr-x 3 root root 4.0K Oct 28 20:41 ../ -rw-r--r-- 1 root root 92 Oct 28 20:41 config -rw-r--r-- 1 root root 73 Oct 28 20:41 description -rw-r--r-- 1 root root 23 Oct 28 20:41 HEAD drwxr-xr-x 2 root root 4.0K Oct 28 20:41 hooks/ drwxr-xr-x 2 root root 4.0K Oct 28 20:41 info/ drwxr-xr-x 4 root root 4.0K Oct 28 20:41 objects/ drwxr-xr-x 4 root root 4.0K Oct 28 20:41 refs/ [email protected] [~/project/.git]#Git 命令
混帐初始化
在上面的文件夹中运行“git init”命令,激活并开始监视该文件夹,将其链接到一个新的 GitHub 存储库。 init 命令还在该目录中添加了一个 .git 子文件夹,该子文件夹在该目录下托管 repo 的数据结构。 版本控制需要此信息。 使用 init 命令,我们现在可以开始将本地工作目录设置为 git 存储库。
[email protected] [~]# git init如何克隆存储库?
我们现在可以复制远程托管在 GitHub 服务器. 我们的第一个选项是简单地单击克隆或下载按钮并使用链接右侧的剪贴板选项复制链接并将其粘贴到 wget 命令中以将其下拉到服务器上的文件夹或单击下载 ZIP关联。
[email protected] [~/project/testrepo]# wget https://github.com/drsinger/testrepo.git要克隆存储库而不在命令行上对 GitHub 进行身份验证,您可以使用 GitHub 桌面 改为克隆。
如果你想使用 SSH 拉下一个 repo,你必须设置 SSHKeys。
要提取现有 repo 的副本,我们将使用命令“git clone”和 repo 或服务器位置的 URL。
首先,让我们在 GitHub 上的 git 存储库中添加一个文件。 单击“创建新文件”按钮。
接下来,我们将一些信息添加到新文件中。

在我们将一些数据添加到新文件后,我们然后单击“提交新文件”按钮。

这会将文件添加到 repo 中并将我们返回到主 repo 屏幕,现在显示“file.txt”文件作为 repo 的一部分。

现在,让我们开始克隆吧! 单击“克隆或下载”按钮。 此操作会打开一个下拉列表,其中包含两种转移我们的 repo 的方法。 我们可以使用 https 或 SSH。

接下来,我们复制 https://github.com/drsinger/testrepo.git 链接并将其粘贴到我们的本地命令行终端中。 现在点击进入。
[email protected] [~/project]# git clone https://github.com/drsinger/testrepo.git Cloning into 'testrepo'... remote: Enumerating objects: 6, done. remote: Counting objects: 100% (6/6), done. remote: Compressing objects: 100% (5/5), done. remote: Total 6 (delta 0), reused 0 (delta 0), pack-reused 0 Unpacking objects: 100% (6/6), done. [email protected] [~/project]#而已! Git 已将“testrepo”拉到我们的本地服务器。
[email protected] [~/project]# ll total 16K drwxr-xr-x 4 root root 4.0K Oct 30 05:58 ./ drwxr-xr-x. 44 root root 4.0K Oct 30 02:15 ../ drwxr-xr-x 6 root root 4.0K Oct 30 05:48 .git/ drwxr-xr-x 3 root root 4.0K Oct 30 05:58 testrepo/ [email protected] [~/project]#现在我们可以在本地添加文件,然后将它们推送到我们的 GitHub 存储库。 如果另一个开发人员正在处理同一个项目,将更改推送到主存储库,您现在可以将修改后的数据拉回以将更改合并到本地文件夹中。
向回购提交新信息
现在,让我们使用一些更简单的 git 命令来使用我们在上面创建的 file.txt 使用新数据添加/更新我们的 repo。 首先,我们将在 file.txt 文件中添加一些额外的文本。
[email protected] [~/project/testrepo]# cat file.txt This is a test file. We will clone this repo to a server. [email protected] [~/project/testrepo]# cat >> file.txt this is a new commit. We are adding more data to an existing file and will then stage it, then commit it to our testrepo on github. [email protected] [~/project/testrepo]# cat file.txt This is a test file. We will clone this repo to a server. this is a new commit. We are adding more data to an existing file and will then stage it, then commit it to our testrepo on github.混帐添加
如您所见,我们从两行文本开始,然后使用“cat >> file.txt”命令将更多数据附加到现有文件中。 接下来,我们使用“git add file.txt”命令在本地暂存更改。
[email protected] [~/project/testrepo]# git add file.txt [email protected] [~/project/testrepo]# (当我们运行该命令时,不会有任何特定的 CLI 输出)
在对 repo 进行更改时,需要对更改进行暂存和快照,以便将它们包含在项目的历史记录中。 add 命令执行暂存,这是提交更改的两步过程的第一部分。 在本地进行的任何更改都将成为 repo 下一个快照的一部分,并成为项目历史的新补充。
git 提交
所以,让我们完成我们的更改。 一旦我们按下回车键,一个新的编辑器窗口现在将打开,要求我们添加评论作为更改的提交消息。
[email protected] [~/project/testrepo]# git commit单击键盘上的插入键开始编辑提交。
1 2 # Please enter the commit message for your changes. Lines starting 3 # with '#' will be ignored, and an empty message aborts the commit. 4 # 5 # On branch master 6 # Your branch is up to date with 'origin/master'. 7 # 8 # Changes to be committed: 9 # modified: file.txt 10 # ~ "~/project/testrepo/.git/COMMIT_EDITMSG" 10L, 261C 1,0-1 All现在,我将在第 1 行输入我的提交评论。如果您正在编码,这将是您描述您的更改的地方。 (请不要只使用“更新到第 xxx 行”。 在您的代码注释中进行描述!!!)
1 I have added a short amount of text to demonstrate a commit to our repo 2 # Please enter the commit message for your changes. Lines starting 3 # with '#' will be ignored, and an empty message aborts the commit. 4 # 5 # On branch master 6 # Your branch is up to date with 'origin/master'. 7 # 8 # Changes to be committed: 9 # modified: file.txt 10 # -- INSERT --添加完提交信息后,点击退出键(Esc)退出编辑器,然后使用“:wq”命令结束编辑。 然后我们看到以下报告:
[email protected] [~/project/testrepo]# git commit [master 9efda19] I have added a short amount of text to demonstrate a commit to our repo 1 file changed, 2 insertions(+) [email protected] [~/project/testrepo]# git 推送
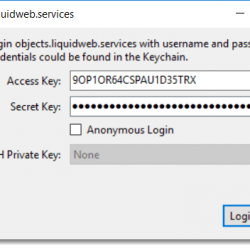
下一步是将我们的本地信息“推送”到 GitHub。 我们将运行“git push”命令来完成此操作。 因为这是我们的第一次推送,所以需要我们的用户名和密码才能将其添加到 GitHub 存储库。
[email protected] [~/project/testrepo]# git push (gnome-ssh-askpass:55417): Gtk-WARNING **: 14:25:25.456: cannot open display: error: unable to read askpass response from '/usr/libexec/openssh/gnome-ssh-askpass' Username for 'https://github.com': [email protected] (gnome-ssh-askpass:55578): Gtk-WARNING **: 14:27:31.406: cannot open display: error: unable to read askpass response from '/usr/libexec/openssh/gnome-ssh-askpass' Password for 'https://[email protected]@github.com': Enumerating objects: 5, done. Counting objects: 100% (5/5), done. Delta compression using up to 4 threads Compressing objects: 100% (3/3), done. Writing objects: 100% (3/3), 433 bytes | 433.00 KiB/s, done. Total 3 (delta 0), reused 0 (delta 0) To https://github.com/drsinger/testrepo.git 27d4315..9efda19 master -> master [email protected] [~/project/testrepo]# 现在,让我们看看 GitHub。

噗! 更新了!
最后的想法
我们在这里只触及了冰山一角,因为还有许多其他功能和选项可用于使用 Git 和 GitHub。 人们使用它来跟踪汽车维修、笔记食谱和数百种其他用途。 甚至还有一个 GitHub 可以跟踪 美国宪法! 这个工具有很多用途,不仅可以使您在技术领域受益,而且可以在日常生活中受益。 你能想到什么用途?
有关更多信息,这里有几个链接可以继续学习 Git
今天加入我们的行列!
想了解更多有关此类工具和其他工具如何对您的业务模式产生积极影响的信息吗? 立即联系我们,了解如何利用 最新技术 在市场上!
给我们打电话 800.580.4985,或打开 聊天 或与我们联系,立即与我们知识渊博的解决方案团队或经验丰富的托管顾问交谈!